Installing a door knocker feels like a small home project, yet it sets the tone of the entrance. This guide keeps the work clear, steady, and easy to follow. The full process usually takes thirty to forty five minutes. Both main ways of installation appear here, one where the knocker sits on the surface and one where the rods pass through the entire door. Each path fits different needs. Before you begin, choose your preferred design and finish from the collection page. Once that is done, the steps fall into place. The aim is simple. Help you fix the knocker with care, protect the door material, and reach a clean and lasting result that fits the style of your home.
The way you fix the knocker depends on how heavy it is. Light pieces stay secure on the outer surface of the door. Heavy pieces work better when they pass through the entire thickness. Doors made of wood are easy to drill. Metal doors need bits that can cut through tough layers. Composite doors need calm drilling so the top layer does not crack. The height also matters. Most homes place the knocker between fifty four and sixty inches from the ground. This height makes it easy for most people to reach. If your door has a glass panel or a hollow section that may break, calling a trained worker is safer. Thinking through these small details before touching the drill keeps the project smooth and stops later mistakes.
Tools and material, helps to drill with steady speed lets you open clean holes. The bit must match the material of the door so the edges do not chip. A tape helps you find the center. A small level keeps the knocker straight. A pencil marks the points without leaving strong stains. A hand tool for the screws keeps the hardware tight. A thin strip of tape on the drill point helps the bit stay firm. For the method where rods pass across the door, a tiny drop of thread adhesive can stop the nuts from loosening over time. If the rods are longer than the door thickness, a small cutting tool can shorten them. These simple items keep the project calm and controlled from start to finish.
Read More : The Complete History of Door Knockers: From Cathedral Doors to Modern Homes
In surface mount method, the screws stay on the outer face of the door. The work usually takes fifteen to twenty minutes. Light knockers fit this method well and suit doors where you want a quick fix without touching the inner panel. The charm lies in its speed and few steps. The drawback is that the screws remain visible and do not give the strongest hold for heavy pieces. A side cut of this method would show the screws entering only part of the door and stopping inside the material.
In bolt-through method, the rods pass across the full door and tighten on the inside with round nuts. This forms a strong hold that lasts for many years. The work takes around thirty to forty five minutes, yet the finish feels clean and balanced. Heavy knockers and high use doors suit this method well. It removes the sight of screw heads on the outside and keeps the knocker firm even with daily use. A side cut of this method would show the rod traveling through the full thickness and ending in a nut on the inner surface. The extra time spent on drilling through the door brings a lasting result many people prefer.
A clear finish emerges once you choose the method that fits the weight of the knocker and the nature of the door. The right choice makes the project feel less like repair work and more like adding a small touch of craft to your home. The entrance becomes a quiet mark of care and detail, ready for every visitor who lifts the knocker.
| Feature | Surface Mount | Bolt-Through |
| Time |
1520 min |
3045 min |
| Security |
Moderate |
High |
| Skill Level |
Beginner |
Intermediate |
| Door Damage |
Low risk |
Medium risk (drilling through) |
| Best For |
Lightweight, decorative |
Heavy, authentic period |
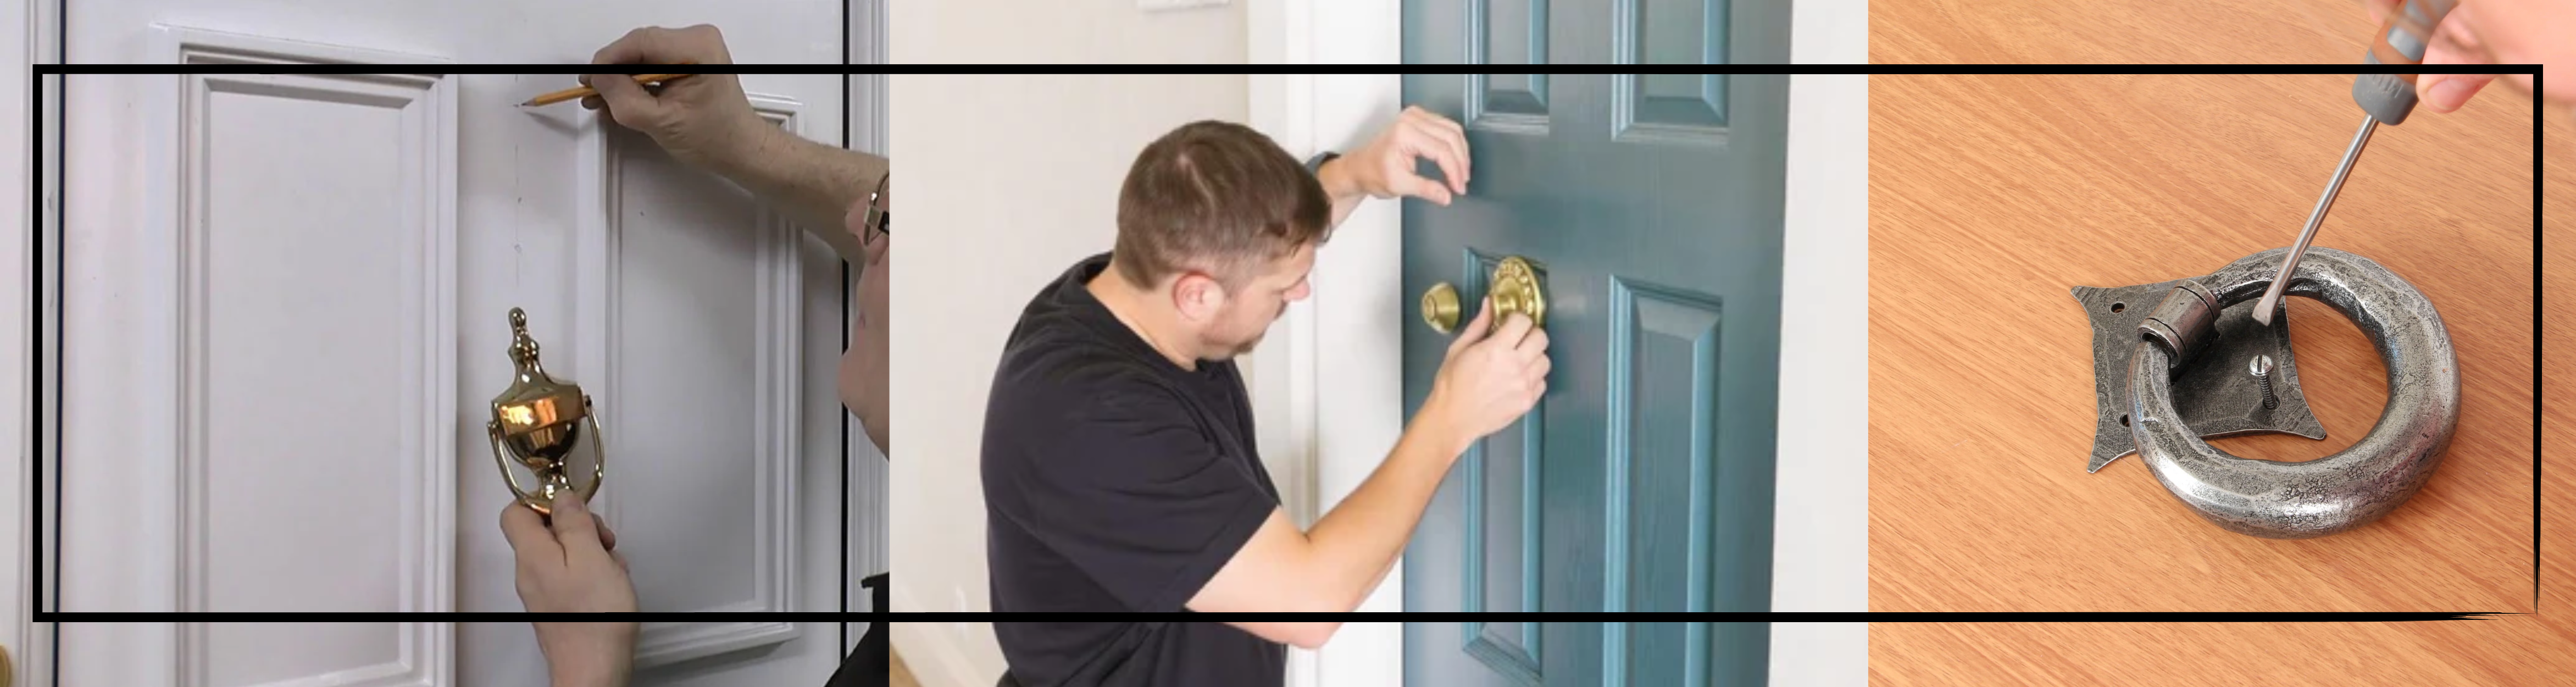
The first task is finding the right height for the center of the knocker. Most homes choose a point between fifty four and sixty inches from the ground. This range works well for people from about five foot four to six foot two, so almost every visitor finds it natural to reach. Take a tape to measure the height and hold a small level to keep the line straight. Mark the point with a light pencil touch so the door does not stain. Picture a simple scene of a tape hanging down the panel while you note the center point for your door knocker installation. This height sets the balance of the full piece and shapes how the entry feels.
Once the height is fixed, hold the knocker in that exact spot. Look at where the holes sit on the piece and mark the points through them with your pencil. These marks guide every step that follows. Bring the level again to make sure the knocker sits straight. Spend a moment checking the marks because a small tilt here becomes a bigger problem later when you drill. This step feels slow, but the care you put in now protects the door and keeps the final shape clean.
The next part is opening the small starter holes that guide the screws. Choose a drill bit that is a little smaller than the screw. If you are working on wood, drill only half to two thirds of the screw length. If your door is metal, take a bit made for metal and add a drop of drilling oil so the movement stays smooth. Place a small strip of tape on the drill bit to remind you where to stop. These shallow holes help the screws settle without stress and keep the door surface safe. The feeling is almost like clearing a small path before placing something important.
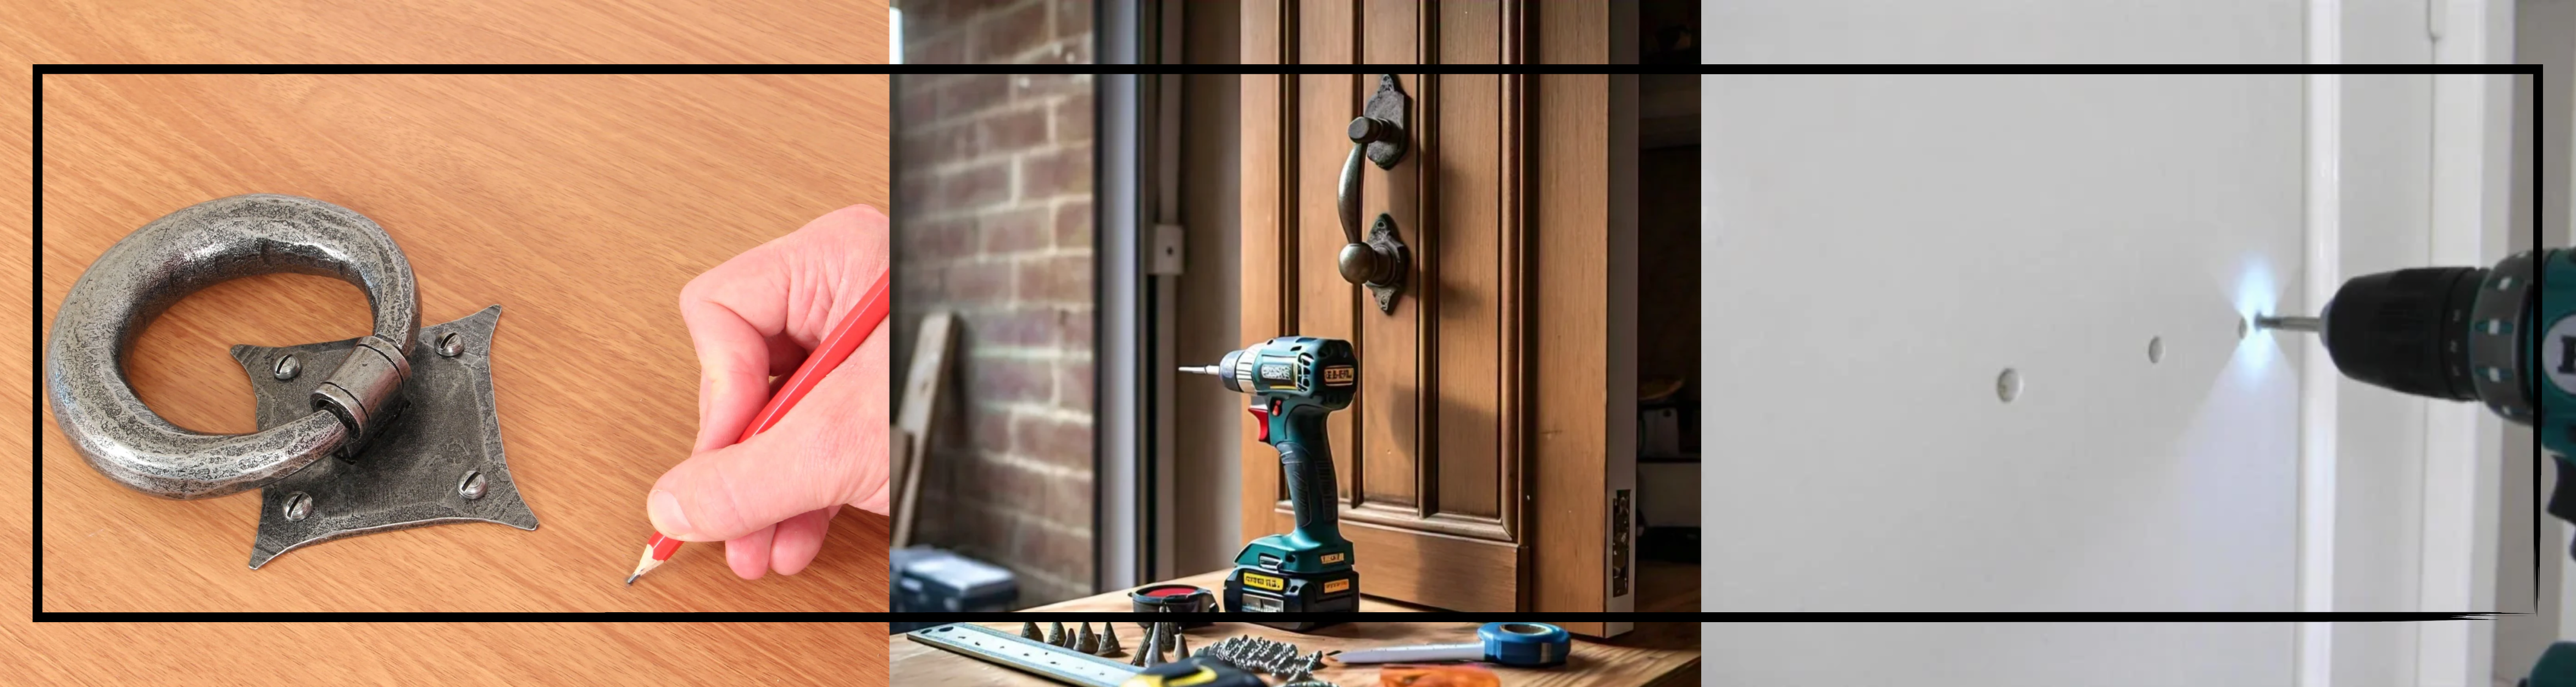
Some knockers come with a small plate that sits below. This plate protects the door each time the knocker falls. Hold the plate in place and mark its holes just like before. Drill the small guide holes, then fix the plate with gentle pressure. This part matters more than it seems because over time the knockers impact can leave dents or marks. The plate spreads the force so the door finish stays neat. It becomes a quiet shield that works every day without notice.
Now return to the main piece. Place it on the guide holes you made earlier. Insert each screw slowly and tighten with your fingers first so the threads catch evenly. After that, tighten both sides little by little so the pressure stays balanced. Do not force the screws because too much pressure can crack wood or loosen the mount. This is where the knocker takes its true shape on the door, so a calm hand matters more than speed.
Once the piece is fixed, lift the knocker and let it fall gently. The movement should feel smooth, without rubbing or sticking. The sound should be clear and full. The plate below should catch it in a clean hit. A short test like this tells you the work is complete. It is a small moment that carries quiet satisfaction, almost like tuning a tiny instrument at the entrance of your home. This is the final touch before your door welcomes its next visitor.
Ready to install? Shop now by following the link.
Bolt-through method feels closer to the work of a skilled craftsperson. It gives the strongest hold and suits heavy pieces that must stay firm for years. The process is slower, but every step adds strength. It also works well when you want a cleaner face on the outside of the door because the screws sit inside. This style is used in many older homes where the entrance carries a sense of weight and story. It turns a simple door knocker installation into something that feels measured and intentional. The aim is steady progress from the outer face of the door to the inner one, ending with a balanced, secure hold that lasts.
If you are replacing an old piece, begin by checking the distance between the holes already in the door. This is called the center to center measurement. It is usually three, four, five, or six inches. Hold a ruler or calipers against the surface and read the space between the holes. This number guides the choice of your next knocker because it must match the same distance or come with a wide backplate that hides the old marks. This simple act of measuring gives you a clear base so the new piece sits clean and covers the past without leaving marks.
Once the size is known, hold the new piece at the right height on the outside face of the door. The best height still stays between fifty four and sixty inches from the ground. Mark the exact points through the holes with a pencil. Bring the level to ensure the piece stays straight. Some people ask a helper to hold the knocker while they mark so nothing slips. These marks become the exact places where the drill will enter. When you look at these marks, you can picture where the new door knocker will sit with a balanced line that fits any type of entrance.
Choose a drill bit that matches the size written in the knocker instructions. Most pieces use five sixteenth or three eighth size. Before you start drilling, place masking tape on the inside face of the door. The tape keeps the inner side from cracking when the drill breaks through. Begin on the outer face and move slowly. A steady hand keeps the hole clean. This step may feel tense because you are cutting through the full door for real, but slow drilling gives a smooth path. Once the drill breaks through the tape inside, you know the opening is ready.
Take the threaded rods that come with the knocker and place them through the openings on its backplate. Push them through the new holes in the door. They should come out one or two inches on the inside. These rods become the backbone of the mount. When you see them pass through the door, it feels like the piece is reaching from the outside world into the inner side of the home, joining both faces with a single hold.
Move to the inside face of the door. Take the inner plate and slide it over the rods. Adjust it until it sits flat. When it rests without any gap, the door gains a stronger hold. This inner plate spreads the pressure and keeps the rods from pulling into the material. It is the quiet support that makes this method more secure than surface mounting.
Fit the acorn nuts onto the rods. Turn them by hand first so the thread catches cleanly. Tighten one side a bit, then switch to the other. This pattern keeps even pressure. Use a small wrench to give a final quarter turn. If you want a long term hold, add a drop of adhesive on the thread before tightening the nuts. The moment the nuts sit firm, the door knocker installation gains its true strength.
Sometimes the rods extend too far past the nuts. If they do, cut the extra part with a small saw. Leave about a quarter inch beyond the nut. After cutting, file the end so there are no sharp edges. This tiny detail keeps the interior clean and safe. Wear safety glasses here because small metal bits can fly. This trimming makes the inner side look neat and finished.
Move back to the outer face and place the small plate where the knocker will fall. Mark the point, make the small guide holes, and fit the plate. This protects the door and completes the look. When you see the piece fixed from both sides, the work feels whole. You have created a strong mount that can handle heavy knockers and daily use with ease. The final result feels steady, balanced, and ready to welcome anyone who arrives.
Installing on Different Door Materials shifts the focus from the knocker itself to the surface it will live on. Every door has its own character. The grain of wood, the chill of metal, the smooth gloss of a composite door, each reacts differently when you drill or tighten. A guide like this helps anyone understand how to install door knocker parts with care, especially when the goal is a clean finish and long life. The small choices you make here decide how well the door knocker installation holds through years of knocks, weather, and daily use.
Wood feels familiar and forgiving, which is why it is the most welcoming surface for this job. A basic wood bit is all you need. A small pilot hole helps the bit enter without splitting the grain. Hardwoods ask for a slower drill speed because they resist more, while softwoods can dent or compress if you tighten the screws too hard. Stop when the parts feel firm. The idea is to let the knocker sit snug on the surface without forcing the screw deeper than it wants to go. Wood gives a warm, classic look, and that helps when you install door knocker hardware on older homes or cottages where texture tells a story.
Metal brings a different mood. It feels strong but also stubborn. You need cobalt or titanium bits to cut through cleanly. A small drop of oil on the bit keeps heat down while drilling. Begin with a small pilot opening and expand only if the instructions demand it. Some setups need self tapping screws because metal does not grip like wood. Tiny curls of metal fall as you drill and they are sharp, so brushing them aside with a cloth keeps the work safe. Many modern doors use metal skins, so anyone learning how to install door knocker fittings on them should move slowly and expect more resistance.
Composite and uPVC surfaces look simple but behave in odd ways. They soften when warm, so a masonry bit at a gentle speed helps you cut without melting the material. Always drill from the outer face because the inner core might not match the outer shell. Do not tighten the screws too much because the surface can crack. Some hollow core versions cannot take bolts through the full thickness, so a surface mount becomes the safer path. Makers of these doors often state that drilling may cancel any support policy, so reading the small print helps if you plan to install door knocker composite door hardware here. Try a tiny test in a spot no one sees before making the real openings. This gives you a sense of how the material reacts.
Fiberglass sits close to composite in feel but often needs a finer touch. A fine tooth hole saw gives a clean, round opening without tearing strands of the inner fibers. Put a small board on the inside to support the cut as the bit breaks through. If the door faces the outdoors, seal the fresh openings with a marine grade sealant so water does not seep inside during rain. Fiberglass holds a knocker well, but the strength comes from thoughtful drilling and tidy sealing.
Read More : Door Knocker Styles Guide: Matching Hardware to Your Home's Architecture
Glass doors invite light but do not enjoy drilling. Making a hole in glass needs special tools used in workshops, not living rooms. A tiny mistake can cause a break across the whole panel. That is why this surface calls for a trained worker. If the look of a knocker is still important, there are adhesive based mounts made for smooth surfaces that avoid drilling altogether. They give the style without risking the glass. Understanding these limits keeps the work safe.
Each door material asks for small shifts in method. When you learn how each one behaves, the whole process of how to install door knocker parts becomes calmer and smoother, and the final result stands firm without stress on the door.
Critical Role of Striking Plates helps protect the door from every knock.It takes the hit, not the paint or polish.
- It stops dents, chips and worn spots from forming.
- It makes the knock clearer because metal meets metal at one steady point.
- It keeps the sound sharp and easy to hear across the house.
- It holds a fixed contact point so the wear stays controlled.
- It should sit two to three inches below the knocker for a clean fall.
- It must sit flush so the door surface stays safe in all seasons.
- It is essential, especially for exterior doors where moisture and heat create slow damage.
A simple plate turns a small tool into a long term fit. The door stays neat, the sound stays bright, and the entrance feels cared for.
Most common installation mistakes come from rushing or choosing the wrong tool for the door.
- Wrong height- Install the center of the knocker between 54 and 60 inches.
- Overtightening- Stop when the screw feels snug. Extra force strips wood and cracks composite.
- No pilot holes- Always drill pilot holes. They stop splitting in wood and tearing on coated surfaces.
- Crooked placement- Use a level before drilling. Even a small tilt stands out.
- Wrong drill bit- Wood bits for wood doors.
- Metal bits for metal doors.
- Masonry style bits for composite and uPVC.
- Missing striking plate- This shortens the life of the finish and blurs the sound.
- Drilling into glass panels- Never do this. Glass can shatter with a tiny slip.
- Hidden wiring or door core surprises- Check the door type or maker notes before drilling deep.
- Ignoring composite door rules- Some panels void the warranty if drilled. Always read the small notes.
Some hollow cores only support surface mount styles. Simple checks prevent expensive mistakes and keep the installation clean.
If something feels off after fitting, Troubleshooting installation issues small fixes help.
- Wobbling knocker- Tighten the screws little by little until the movement stops.
- Stripped holes- Fill with wood filler and small wooden sticks. Let it cure for a day, then re drill a pilot hole.
- Knocker stuck or too tight- Loosen each screw by a quarter turn. Add a drop of oil to the hinge pin.
- Weak sound- Adjust the striking plate so the knocker meets it cleanly.
- Screws loosening after a few days- Add a small bit of thread adhesive and tighten evenly.
- Metal shavings in the hole- Clear them with a small brush so the threads stay smooth.
- Hairline cracks in composite- Stop drilling. Seal cracks and consider a surface mount if the core is hollow.
If the door is glass or unusually delicate, call a trained installer. Forcing it makes things worse.
Read More : Door Knocker Materials Guide: Brass vs. Iron vs. Bronze - Complete Comparison
A good installation comes from simple steps done with care.Measure well, pick the right tools, use a striking plate, and follow the rules of your door material. When each step lands right, the door knocker feels solid, sounds bright, and lasts a long time.
If you are ready to fit or upgrade, explore the full range of door knockers and install with confidence.